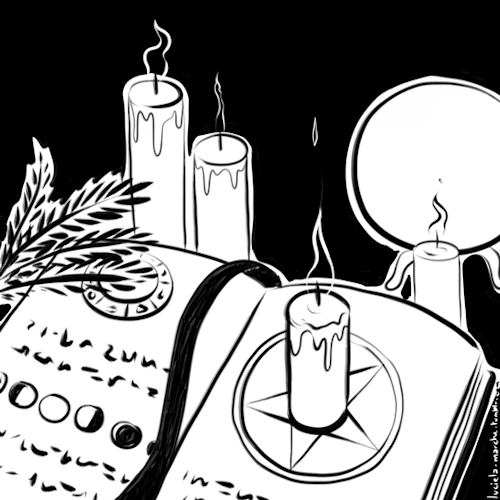
So spells are clearly a witches thing. Or also used in several cultures for healing etc. However, not many newer witches understand what a spell really is or how they really work. Heck, probably half of the community knows. I don’t think I am the only correct source, so please do look around and get more information.
Let’s get started.
———————–
What Is a Spell?
a form of words used as a magical charm or incantation; a state of enchantment caused by a magic spell; an ability to control or influence people as though one had magical power over them(google).
For our sake, a spell is simply used with words, ingredients, items and writing. Not all have to be involved though. And most of the time they aren’t used by everyone.
Do Spells Work?
For the most part? Yes. They do. However, sometimes they won’t and that’s okay too. It just means you need to do something different or figure out how it could have gone wrong.
What if a Spell Goes Wrong?
Try a spell reversal. A lot of people have resources on this, it’s a good thing to research especially before you start spell casting.
What Can Be a Spell?
Anything. A spell for bringing love to you all the way to cursing someone who has wronged someone else. These all account as spells.
Should I Use Protection?
Ignore how I worded that. But yes. You should use any form of protection you can from tailsmans to casting a circle. Even a small chant will be better than nothing.
A Spell of Mine Didn’t Work… What Do I Do?
Take notes on what happened. Give it more time to fully manifest. Be Patient. If you feel it genuinely didn’t work you can try again, but do give it time. It might not have worked in the way you wanted it to.
How Do Spells Work?
Most of the time it’s all about energy, intent, visualizing the outcome you want, and manifesting it. While you don’t inherently need tools or ingredients(some will say otherwise) they can be helpful to give your spell an extra oomph you need especially if you don’t have a lot of energy yourself.
What Do I Need For Spells?
A Book and a Pen. All to take notes and write out your spell. Again, you don’t need anything at all for spell casting. They may be helpful, but not needed at all.
For the most part yes. The ones posted are usually meant to be used for others to help them. I typically use the spells posted to help me make my own though so it’s up to you.
How Do I Know My Spell Worked?
Did the outcome you want come? Then yes. If your unsure then go search out some answers. Tarot, or some other form of divination can be helpful.
Are Spells and Rituals the Same?
In my own personal opinion? No. To others they may be the same, but for me they have different energies. A ritual is set in stone, copied almost every time you reach a certain point. A spell is something you can do on a whim. But again. My Own Opinion. Others may have something else to say about that. It’s good to look into it though.
How Do I Write My Own Spells?
Here’s a little template for you to help as I’m not the best at wording most of the time:
1. A title for your spell
2. The Intentions you have for the spell
3. The Date, time and Moon Phase(moon phase and time are optional. Date is helpful.)
4. The Items/Ingredients you need(if any at all)
5. Any words/chants you plan to use or used.
6. Instructions!
Anyways, I wouldn’t take too much spell writing advice from me as I usually write out my spells after I cast them.
Again, I’m not a full expert on this process. I probably never will be, but I hope this is slightly helpful for those who are trying to figure it out.
So, today we’re going to talk about a slightly more obscure tool: the witch’s ladder. There’s some debate as to whether or not this was a commonly used tool in older European traditions of witchcraft. In the late 1870’s a witch’s ladder, along with a collection of brooms, was found in the attic of a recently deceased woman in Somerset, sparking suspicions of witchcraft. Unfortunately, it’s not actually known whether or not this object was really used in witchcraft or how widespread the use may have been if it was. More on the history of these tools can be found here.
Now, what is a witch’s ladder? It’s a type of knot talisman made by inserting small objects into a length of cord, traditionally rooster feathers and sometimes small bones were used but you can use locks of hair, teeth, beads, sticks, leaves, seashells or pretty much anything that works for your practice.
Originally, it’s thought that they were used to curse but their uses in modern practices are endless. I’ll be making one to protect my house and create easier communication with the Other Realms.
How to Make a Witches Ladder
Ok, to start us off we need a few supplies. There are three main things that I’m using.
First is the cord, feel free to use whatever material you like. When I’m doing work like this I prefer to use regular old kitchen twine. It’s sturdy and not overly processed. You could use yarn, thread, rope, sinew or ribbon as well though.
The second thing that I’ll be using is a couple of small bones, I’m using six because I like working with multiples of three.
Finally, the feathers. These are brown mourning dove feathers; I’m using these as opposed to another type of feather because they’re good for communicating with Spirit and for fostering awareness.
I would like to mention here that while handy in the craft, collecting bones and feathers that you find can be illegal.Most birds are protected species and regardless of whether you found the feathers or ripped them off of the bird yourself, possessing them is illegal. Be sure to check the laws in your area. This problem can usually be solved by writing a letter to the appropriate wildlife officials asking for permission to pick up specific types of bird feathers for a collection. Once written permission is obtained it only has to be kept with the feathers to avoid any ramifications. Of course, if you’re not going to be waving about rare bird feathers in the town square this is probably unnecessary.
As I said, you can replace bones or feathers with whatever you like. Use Barbie arms if that’s what floats your boat. I usually use nine items in mine and the traditional number would be thirteen but feel free to adjust this to fit your needs.
Another optional material would be a metal ring, you can tie the ladder to this and use that to hang it from a hook on the ceiling or something if you like. I’ll just be using a thumbtack.
As always prep yourself and your workspace however you prefer. Cast a circle, take a ritual bath, light some incense, maybe put on some music. Consecrate your supplies and get to work.
The creation of a witch’s ladder is surprisingly simple and quick. Take your cord and cut three equal lengths. How long you make it is up to you, for example, I like each length to be from the fingertips of my left hand to my heart in length. Tie the ends together, if you are using a metal ring, tie it to the ring; otherwise just an overhand knot on the end does the trick.
Start braiding, for this one I used your typical three-strand braid but you could add and subtract cords and use rope braids, fishtail braids or five strand braids as well. As you braid begin adding in your objects. I don’t do anything special, I just keep braiding as usual while adding my feathers and stuff in between two strands. Here’s a close-up of my ladder partially finished.
I spread mine out semi-evenly along the length of the cord, if you’re a stickler about getting things even then make sure you remember that you’ll lose about a third of the cord length in the process of braiding.
As you add each item to the ladder spend a few moments to state your intention or meditate on the purpose of your spell. I kind of just spend the entire time I’m making the ladder talking to it and telling it what I would like of it. You could also use the traditional nine knot spell if incantations are your thing. I find them too constricting for my practice but for those of you who prefer more ritualized working here it is
“By knot of one, the spell is begun
By knot of two, it cometh true
By knot of three, so mote it be
By knot of four, the open door
By knot of five, it comes alive
By knot of six, the spell is fixed
By knot of seven, it has the power of heaven
By knot of eight, the open gate
By knot of nine, it is mine”
After all of your items are in place you need to finish your cord. You can just tie a knot in it and either trim the excess cord or let it hang there, or you can add something to the end as a sort of weight, bells are a common choice. Feel free to let it charge in the light of the moon or sun if you like.
Once it’s completely done take it and hang it somewhere, I like to have them on my porch but hanging it in your room or kitchen works as well. If the spell is more malicious I’d suggest hiding it away somewhere close to your target instead of hanging it.
Here’s my finished ladder, hanging out on my porch.
A few ideas for uses of these lovely tools:
Warding magic – Use to create a “Do Not Enter” sign for unfriendly energies. The ladder conveys the meaning that those who would harm are unwelcome.
Attraction magic – Use it to attract people, familiars, ideas, mindsets, jobs, circumstances, luck, etc. into your life
Binding the thirteen moons of the year – This is a method used to harness the power of the thirteen full moons of the year, allowing you to perform weather magic and nature magic more easily and opening the doorway to the Other Realms.
Traveling – Ladders can be used as a gate into the Other Realms. An actual “ladder” for your spirit to climb up into various planes
Natural magic – You can use items related to the branch of nature that you work with. For me it’s trees but perhaps you work with the ocean, mountains, forests, animals, insects, and so on.
Wish magic – You can use rolled up slips of paper or pressed leaves and make a ladder with them, writing your wish on each one. As the ladder is slowly destroyed by the elements, your wish comes true.
Divination – I’ll need to make a full post about this if anyone is interested, it’s a tad complicated
Worship – You could use a witches ladder as an offering to a deity, perhaps as a nine day devotional where you tie in an offering every day and ending with hanging it on the last day
Curses – and of course, witches ladders can be used to curse.
As usual, if anyone has any questions or would like me to make a follow up post on anything I’ve mentioned here, let me know!
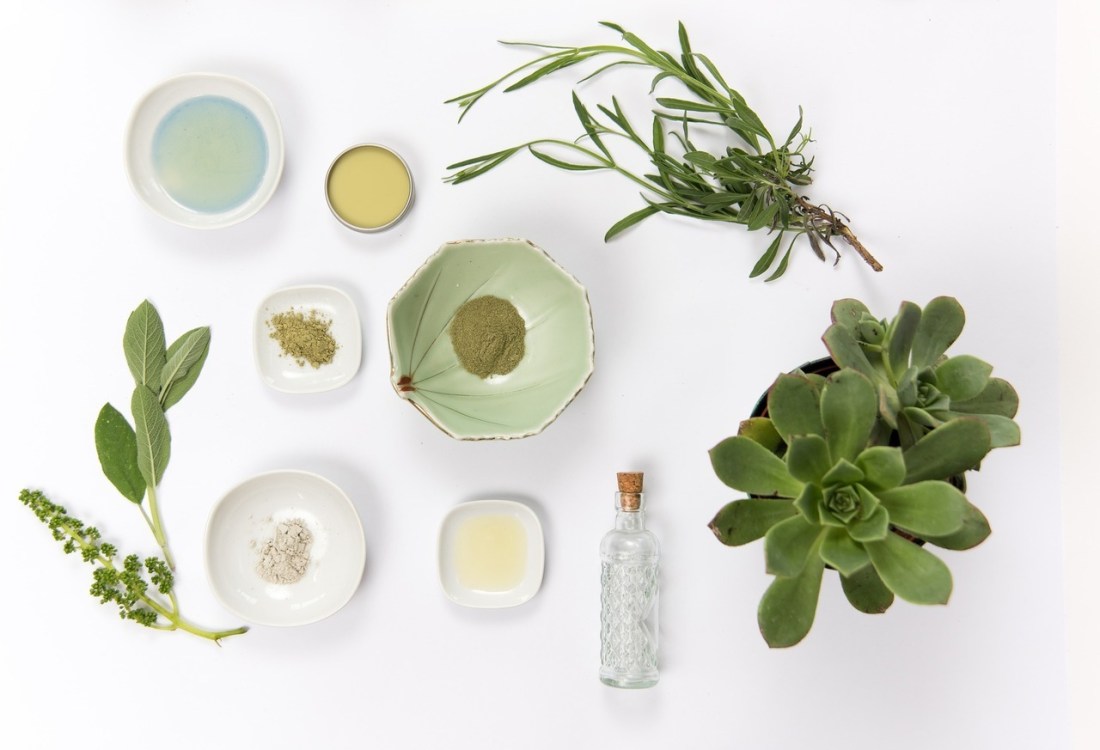
Salves are a simple yet effective way of applying the medicinal qualities of herbs. They’re the consistency of a cream at room temperature and portable for on-the-go topical application. By combining various herbal-infused oils, an individual can address a variety of ailments, from arthritis to asthma. Each salve can be customized to the individual to treat a specific illness or can be general all-heal tool in your first aid kit.
Base Ingredients
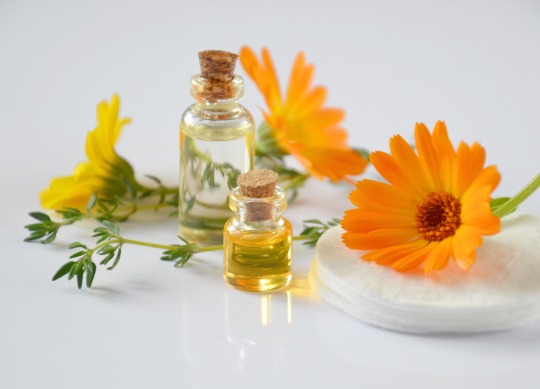
Herbal-infused Oils
To craft a salve, you must start with herbal-infused oils as your primary base. For this, there are two components: your choice of herb(s) and your choice of carrier oil(s). Some commonly used carrier oils are olive, grapeseed, almond and safflower.
At the end of this post, there will be an overview of common herbs and carrier oils so that you can make an educated decision when crafting your herbal-infused oils.
Here are two basic methods of infusion:
Solar Method (Folk Method)
Take a sterilized jar and fill ⅓ to ½ of it with your choice of dried herbs.
Cover with your carrier oil. Add around 500 IUs of vitamin E oil for every 8 oz. of carrier oil to prolong shelf life.
Cap the jar tightly and place in a sunny space – either outdoors or indoors. Shake it daily.
Allow the mixture to infuse for 2 to 3 weeks, or until the oil takes on the colour or aroma of the herb within.
Once the oil is ready, strain using a cheesecloth and bottle into a tinted sterilized jar. Store in a cool, dark place.
Slow Cooker or Stove top (Fast Method)
Place your choice of dried herbs in your slow cooker or pot and cover with your carrier oil. Add around 500 IUs of vitamin E oil for every 8 oz. of carrier oil to prolong shelf life.
Gently heat the herbs on very low heat (100 – 140 degrees Fahrenheit) for 1 – 5 hours until the oil takes on the colour and scent of the herb. You can cook it for longer at 100 F if you would like.
Turn off heat and allow to cool. Once the oil is ready, strain using a cheesecloth and bottle into a tinted sterilized jar. Store in a cool, dark place.
Do not use fresh herbs when crafting herbal-infused oils. They contain moisture and promote the growth of mold, especially if infused via solar method.
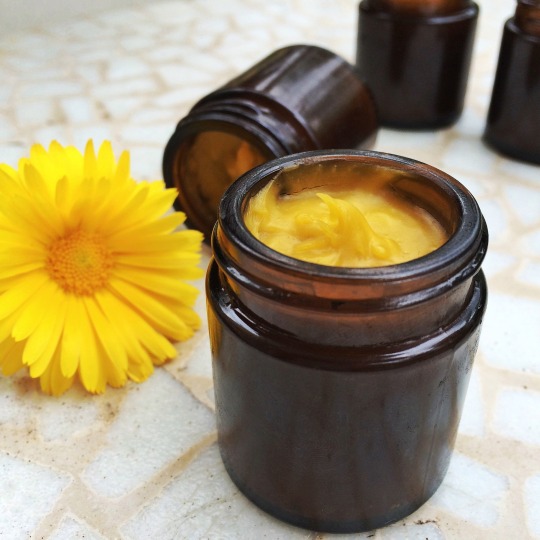
Wax
Waxes are frequently used in making cosmetics, body care products and salves: they help to bind and emulsify ointments and lotions. They also function as a natural hydrating ingredient and alleviate itching for those with sensitive skin.
The most commonly-used wax for crafting salves is beeswax; however, vegans and those with allergies can utilize carnauba wax which is sourced from the leaves of a Brazilian palm tree.
Method
Once the herbal-infused oils are prepared, the process of making a salve only takes a few minutes. Here are the steps involved in the process:
On low to medium heat, warm the herbal-infused oil(s) in the top of a double boiler or in a small saucepan.
Add the wax. Once the wax has melted, remove from heat.
If any, stir in any additional ingredients of your choice, such as essential oils.
Pour into your designated container(s).
Recipes
Soothing lip salve
3 tbsp beeswax
3 tbsp aloe vera gel
2 tbsp oil of choice
8 drops essential oil of choice (optional)
Salve for minor scrapes, bites and burns
1 ½ cups comfrey-infused oil
1 ½ tbsp coconut oil
¼ cup (55g) beeswax
Healing salve
1 quart (1 litre) of oil infused with equal parts St. John’s wort, comfrey, peppermint and lavender
¼ cup (55g) beeswax
Salve for backaches
1 cup ginger- and peppermint-infused oil
2 tbsp (22g) beeswax
First aid salve
1 cup St. John’s wort-infused oil
2 tbsp (22g) beeswax
Salve for rheumatoid arthritis
1 cup ginger- and licorice root-infused oil
2 tbsp (22g) beeswax
Common Carrier Oils
Almond oil, sweet: A fantastic carrier oil that contains fatty acids and vitamins A and E. It’s an effective emollient for moisturizing both skin and hair and is easily absorbed by skin.
Argan oil: This is a staple in moisturizing skin and hair care products. Argan oil contains tocopherols, phenols, carotenes, squaline and fatty acids – it’s a truly luxurious oil.
Evening primrose oil: Prized for its health and cosmetic benefits.
Grapeseed oil: A common base for many creams and lotions – it’s the go-to carrier oil since it’s especially useful for skin types that do not absorb oils well and does not leave a greasy feeling.
Olive oil: The most commonly-used oil in cosmetics and hair care.
Safflower oil: A highly-moisturizing oil that soothes troubled skin.
Common Herbs for Health and Wellness
Aloe Vera: Excellent for treating burns, cuts and scrapes.
Arnica Montana: These flowers offer strong anti-inflammatory properties. (Do not use in open or bleeding wounds. Long-term use can cause skin irritation.)
Black Cohosh: Offers anti-inflammatory and pain-relieving benefits. (Do not use during pregnancy or breastfeeding. Can cause gastric discomfort in some individuals.)
Blue Vervain: Relaxes the nervous system and offers reliable pain relief for rheumatism, joint pain and neuralgia. (Do not use during pregnancy.)
Chamomile: Antibacterial, anti-inflammatory and antispasmodic. (Do not use if on blood thinners or if allergic to ragweed.)
Chickweed: Wonderful for making soothing poultices to treat rashes, skin irritations, minor burns and itching.
Comfrey: Alleviates pain and inflammation; works well on cuts, scrapes, insect bites, burns and rashes. (Do not use on children.)
Echinacea: Antibacterial, anti-fungal and antiviral. (Do not use if you have tuberculosis, HIV/AIDS, autoimmune diseases, lupus, rheumatoid arthritis or if you are allergic to ragweed.)
Ginkgo Biloba: Natural antihistamine, anti-inflammatory and great for treating allergies and asthma. (Do not use if you take monoamine oxidase inhibitors (MAOI), selective serotonin reuptake inhibitors (SSRI), or blood thinners.)
Goldenseal: Antiviral, antibacterial and excellent for dealing with minor cuts and wounds, sinus infections, respiratory congestion, sore throats and more! (Do not use if you are pregnant, breastfeeding or if you have high blood pressure.)
Mullein: Great for first-aid treatment of minor wounds, burns and insect bites.
Plantain: Antimicrobial, antihistamine and anti-inflammatory; great for treating wounds, insect bites and minor aches and pains.
Sage: An excellent remedy for colds and fevers, hot flashes, painful or heavy periods, rashes and sore throats.
St. John’s wort: A strong antiviral; treats arthritis, fibromyalgia, muscle aches and sciatica. (Do not use if you take monoamine oxidase inhibitors (MAOI) or selective serotonin reuptake inhibitors (SSRI).)
Witch Hazel: An effective remedy for acne, cuts and scrapes, insect bites, minor burns and sunburns.
–
Images are under the Creative Commons License.
Information published is from my personal grimoire and has been accumulated over the years through a variety of books and resources while residing in Croatia, Serbia, Bosnia, Cuba and Canada.
It’s so funny that you ask me this, as I was rough drafting a little article about this very subject since I had collected some wand wood earlier in the month, and am currently making some natural bees wax polish for my wands!
Now, everyone will tell you differently about how to craft a wand, so i am just going to tell you my way.
To start, you must find a suitable tree. Different species of trees have various magical virtues in folklore and correspondences. Is there a certain tree to which you are drawn? Has there been Aspen shaking outside your window every night, lulling you to sleep? Perhaps you are drawn to slender Hazel and her soft leaves? Or are you attracted to Rowan’s bright, red, bitter berries? Are you brave enough to approach Grandmother Elder and claim one of her limbs?
Traditionally wand is crafted from Hazel wood when her nuts are just about to pop. Hazel is a strong wood, easy to carve, and grows in lovely straight lengths so it is easy to cut a good rod. The rod should be, traditionally, cut on a full moon on the day Mercury at midnight. According to traditional texts, the rod should be of a year’s growth, and a length approximately from the crook of the elbow to the longest finger of the dominant hand. Though, I have also read that the length should be from the tip of your nose to the longest finger! Use what is comfortable, I think. Though, of course, if you are following the procedure for a specific working, the author may have a reason for the length! For a general wand for general witchcraft, elbow to fingertip is a fine length of wood. Remember, it’s not the size that matters, it’s how you use—
…Sorry…
Anyway! So, now you have your rough wand. Now what you want to do is strip the bark off. Some people like to leave part of the bark on for a handle, others like to strip it entirely bare, and that is up to you. Then you should leave it in a dry place to cure. It should take about a month per inch of thickness, I believe is the general rule. While this is happening, I like to sketch out what I plan to carve into the wand. In traditional texts, you’ll find names of god, runes, Hebrew letters, and so on. Modern wands have various designs carved into them, such as serpents, stars, swirls, leaves, animals, birds, plants, et cetera. If you are not a skilled wood carver, that’s okay! I’ve seen many beautiful simple wands that work just fine. And! If you can practice with some other dry pieces laying about, then you won’t have to worry about ruining your wand. Also, woodburning can take so much of the struggle off.
Traditionally in witchcraft, the tip of the wand is carved into a phallic shape, or at least is pointed. Sometimes a pine cone is carved onto the tip. This is to represent the male principle in witchcraft, as the wand is the phallic instrument of directing energy in its more gentle aspect (as opposed to the dagger which is more aggressive). However, if gender polarity is not your thing, you don’t have to attribute any gender symbolism to this at all! I like to think of the wand as a rod of command, and don’t attribute any gender associates with the wand. (Though, I have seen a wand which is basically a giant wooden penis, and it is just my absolute favorite). I am not much of a woodcarver, so I keep the tips of my wands unadorned and just go a nice tapered point. Or you can go the more modern route and affix a crystal or sacred stone to the tip.
The butt of the wand, or the heel (the end that faces you) can be carved into a hoof if you like, or a ball, or you can even embed a hole in the butt of the wand to place scrolls, magical powders, oils, et cetera depending on the spell you are using. Some writers add that you can seal up your blood and hair to personalize the wand. Or it can be left unadorned. Remember, this is your wand, and you can carve it however way you like.
When you’re done with the carving and decorating, and sanding to smooth it down, you’ll need to polish it to keep the wood free from dust and to keep it preserved. There are many different polishes out there. Gemma Gary recommends using either boiled linseed oil, or bees wax polish. I’m opting for the latter because I like to make my own stuff. She says if you’re using bees wax polish: Once a day for a week, once a week for a month, once a month for a year, once a year for life. This way your wand will be nicely preserved and the wood won’t crack.
When you get to the polishing stage, you can consecrate the wand. There are many ways to consecrate magical instruments from the very elaborate consecrations given in the grimoires, to the simple. From what I have read, the wand should be laid out in ritual space, exorcised of all phantasms contrary to the working, and then a blessing is said over the wand to dedicate it to the service of witchcraft. Then, a bit of blood or spittle is crossed three times upon the surface. The instrument is then slept with for three nights as a consummation of the instrument’s baptism. After this, it should be used immediately in a magical working. Traditionally, the wand, as with all instruments of the Art, should be kept wrapped in black silk and kept out of the way until it is used.
This was a really quick blurb, and I hope to go into more detail about the wand in a later post. I just need to gather my research materials! There are many ways to craft wands, and there are different wands for specific purposes (such as blasting rods!), and different consecration techniques. You should also be mindful about the proper way to harvest wood for a wand (I gave a small insight into this in an article here).
If you’re like me, and like to bring your earthy witchcraft with you this is the DIY for you.
cost breakdown and materials:
✨ Wood box – $2.99 from craft store (but most stores have coupons)
✨ Stain – $4.99 (a small bottle will last you forever)
✨ Moss – $5 from a craft store (I’m sure you can fine it somewhere cheaper)
(side note: I don’t recommend getting it from the ground. It can lead to mold/bugs/allergy issues)
✨ Hot glue
✨ Acrylic Paint and brushes
Prep your box by sanding down any rough edges, removing any stickers, as well as making sure it’s dry and clean.
Stain your box. You can use a rag or brush to apply stain. Read the directions on your stain bottle, and wipe off extra stain. I love wood stain.
The latch has an eagle on it 🙂
After your stain is dry prep for the sky. You can prep with gesso or just white acrylic paint. This will make your colors pop more. I just dove in with painting, but if you want really crisp border lines use masking tape.
While waiting for the white to dry I hot glued in some moss. It takes the glue really well, but retains its fluffiness.
Add your night sky. To avoid having to paint tons of layers because your paint is transparent, ad a little white in. For the sky I mixed white, black, and blue, and left it a little unblended for a foggy feel.
Ad stars. I chose Cassiopeia, Polaris, and the Big Dipper. Use a tooth pic to get small dots.
Add in your items. I didn’t have a tea candle so I made a temporary candle from a shell. I also added some jars for herbs and a couple of crystals.
I made a pentagram for my altar during the New moon in the beginning of this July and I thought I’d share the process with you. I went completely on intuition on this one, not following any spell or rulebook but I’m really happy with how it turned out!
I was making a spell candle for the Imbolc ritual I’m hosting for the coven tomorrow and figured: why not turn it into a little tutorial? So here is my version of the spell candles!
What you need: (note: I made a candle for creativity and inspiration, so everything matches that goal. Change herbs, colours and stones to match any goal you want/need!)
🕯 a base candle, either white or a colour that works for your goal
🕯 through-and-though coloured candles for dripping in colours that match your goal. I usually use two or three, in this case yellow for happiness and inspiration and orange for creativity
🕯 herbs, I used basil (creativity), rose (passion/motivation), mistletoe (fertility for ideas) and mugwort (creativity)
🕯 small stone chips, I used aventurine, citrine and burnt amethyst (all for creativity)
🕯 oils, I used jasmine (creativity)
🕯 ribbon and charm (optional, but pretty!)
🕯 baking paper to protect your work surface
Start with carving some words or symbols into the candle. Today I used a bindrune for creativity, the runes kenaz (inner fire), wunjo (happiness) and gebo (gift).
Now drip the first colour. Make sure to first go around the edges for the pretty drips and then fill in the top.
Next are the herbs, stones and oil. Simply sprinkle them on top and arrange the bigger pieces so they are spread out a bit. Press the stones gently down into the still soft wax for sturdyness.
Drip the last colour, making sure to set but not drown the herbs, and tadaa! One pretty spellcandle! But wait, there’s more!
Tie the ribbon around the candle with one knot.
Slide on your charm and knot again, fitting it snuggly against the candle.
Make a pretty bow and trim the ends,and you’re done!
Burn it during your spell (note: remove the ribbon before it catches and reuse it!), place it on your altar or even make them to give away as gifts!
Also, feel free to tag me if you make one with the tutorial, I’d love to see them! 🌙